31 May 2011

At the moment I'm loving clowns...

...in all shapes and sizes because they're colourful and fun to make while watching Doris. 

These are some oldies, but they're still goodies. I love that about punch art. They stay good forever and only need to be tweaked. 


Sorry if the images are a bit fuzzy, they seem it to me. 

Still working out my colours. I've found some card in the cupboard and I'm sorting through that that see what's going to work. Unfortunately I don't know their names, but they're Bazzill smoothies. Haven't seen much of that range around, have you? 

Okay, cards to make and sort, bye now!

27 May 2011

Fun clowns

I've been at my desk making things like this...

...sigh, makes me happy.

Get annoyed when I have to draw the faces ten times because I can't get a good one. I know, it happens to all of us, doesn't it? Good thing about punching, you can just punch another one (and another one) until you get it right.


I used a Sizzix die called Frame and Frame Back, Scallop. It's an XL die (one of the long ones) and comes with a scallop rectangle shape and the same shape as a frame. I used the full rectangle for the back of this card and the frame on the front there.

The shapes from Sizzix are my favourite. You know, cut and go type shapes. The card bases are my next favourite - cut, fold and go. The foldy boxes and all that are fine sometimes too, but the shapes and bases are my fav because they go with punch art beautifully and add so much fun to what I already do.

That border punch there is the Zig Zag border from Martha. I didn't buy this one when I first saw it, but I get it now. It's a boy one to me and works well with boy-ey stuff and clowns too. See the embossing it does as well? What do you think about that? I'm usually not a fan, but I like this one and how it does it.

All the punches I used are Sullivans ones. I actually used a hand-held hole punch for the little balls and noses. Sullivans doesn't have a 1/4" Circle at this stage. Hopefully they will sometime soon.

I re-made this card this week and changed up the colours a bit. I've been having a bit of a thing with colours lately. Some I've been using for years feel too dark all of a sudden, so I've introduced lighter ones. Currently I'm using the backs of the Bling cardstock - nice and bright. Not the yellow, it's too bright. I use an American Crafts yellow called Dandelion for the yellow. Sometimes it's too bright too - urggh, not all the time, but just when I want to use it for hair.

Anyway, I'll figure it out - at the moment my cardstock is Bazzill - all my usual colours, Bling backs (it's Bazzill too) and a couple of American Crafts yellows (I get 'em at Spotlight). Plus the all-important cream, can't forget that...

Hope you enjoyed the clowns today - have a great weekend :o)

PS. I've written a note to myself to talk about the actual colours (and their names) that I use. Will do that soon.

26 May 2011

20% Off Everything!

Exclusive VIP Coupon - 20% Off Everything! Including Sale Items - Spotlight Australia

Big sale at Spotlight!

Good time to stock up on foam tape and other bits!

Just thought I'd mention - and use a lot of exclamation marks!

25 May 2011

Revamp, redo, repeat or recycle - Flower part 3


I know, you've seen this card a billion times before, but added it to remind you that it was the original card that inspired...


...this.


That paper with all the kitcheny things on it totally rocks. I luurve it. 

And I love that yellow spotty paper (OA) and the little letters from My Little Shoebox, which is why they're on the card frankly.  

I also love (are you feeling the love?) the big, red button. 

Big, red buttons totally float my boat. 

Red is punchy, I love that about red. 

Again, I made a matching envelope. Haven't done any for a while, so good for me. 

Have you been crafting and making some cool stuff?

Sometimes it's so many projects, so little time. That's a bad one. 

Sometimes it's so many projects, so little money. Also a bad one.

Sometimes it's 'I can't be bothered.'

Sometimes it's 'I really can't be bothered.'

Sometimes life gets in the way. 

Sometimes you just can't. 

Sometimes you don't want to. 

Sometimes you'd rather watch Masterchef and wish you could actually taste the food. 

Sometimes it's 'Gosh, if I have to go make something right now, I'm going to vomit.' 

Yep, been there. Not the actual vomiting, but the definite yukky feeling. 

Sometimes it's ebb and flow with a lot of ebb and no flow. That's depressing. 

Sometimes it's good though.

Sometimes you get an idea and you just have to make it now. 

Sometimes you get so inspired that you get a spring in your step. 

Sometimes it's all just clicking. Ideas and hands are flying around...the clock says 3:30 am and a voice says, "If you think I'm going to bed you've gotta be joking..." 

Yep, been there too. 

Where are you??

24 May 2011

A Scrap Quiz - Where do you get your photos developed?

I know! I'm only onto Question 4...


I get them developed at Harvey Norman. And that's in-store.

I've had them done at Snapfish online before, but I find their shipping too high, and once I had to get them to totally redo a whole order of 200 photos because they just weren't great. They have a 110% guarantee and they fixed the problem, but still, I'd rather just have it done right the first time.

I have had them developed online with HN too, but I think the ones printed in-store are better.

You know how you know when the milk is off? You open the lid, pour it in your cereal, take the first mouthful and then you think - something's off, something's weird. If the milk's fine, you don't ask if it's off, know what I'm sayin'?

With the photos from HN, I order them, get 'em and look at 'em and don't ask if they're off. A good thing if you ask me.

So I like them from in-store better. Plus I like using the new machines. Plus I like getting the photos straight away.

If I'm pushed for time (and can't get to the shops), I'll order from HN online and get them shipped to my house for $2.95. You can order them online and then pick them up in-store for free if you like too. Lots of options.

I pretty much get all my photos developed in 4 x 6 with the occasional enlargement. I do enlarge my living room photos to 8 x 12 because I like 'em like that. I also get them done in matte to save the fingerprints. The colour is better with a gloss finish though.

As for price - I usually pay 12c a photo, but sometimes they have a 9c a photo special like they did recently.

Oh, last thing. I get my photos done in small batches. I try to get down there regularly, so the photos don't build up too much.

I print my photos, so I can put them in my album and enjoy them. Just the other day I was flipping through and found this photo of Cody.


I laughed at how neat his hair was back then! It was still growing in, but look how neat...so funny. And I know his white tail hair is twice as long now...

(That's lipstick. He kissed our friend Chris when she came over. Naughty.)


Here he is a week or so ago. Look at the scruffy ear hair. They're the bits that need the most brushing and sorting out. And his tail hair is hilarious - feather duster, feather duster....

That's why I print my photos, put 'em in an album and flip through them. To have fun moments like that. I've just realised...I was going to show Andrew the pic of 'neat' Cody. Maybe I'll just direct him to this blog post instead? Nah, I'll pull out the album - that's what I made it for!

Bye now!

:o)

21 May 2011

Goldilocks and the three bears...

Goldilocks (that's me) made three bears. 

She made 'em from the Shrinky Dinks shrink plastic she found in the cupboard. 

She used her Sullivans bear punch to punch the bears out and got a little concerned when the punch jammed. She banged it and it went back to normal, but still, it wasn't good. 

(Goldilocks remembers the last time she made Shrinkies. She used a different brand of punches back then and they were more solid. Some companies now make their punches with a bit less steel inside them, so they're lighter and cheaper. She remembers how heavy the old ones were. Yep, they're not like that anymore. 

Anyway, Goldie says things have changed and to be careful with your punches, or use dies if you're unsure. Or punch the teddy out in cardstock, trace it onto the shrink plastic and cut it out for an even safer option.)


Goldie used a Sharpie to draw the face on. Her Sharpie doesn't like getting started on slick surfaces, so she had to be careful when drawing.

She actually had to chuck a teddy and punch another because she drew a dumb face. Shrinkies or not, that's pretty usual. Sometimes, no matter what Goldie does, she can't draw a good face to save her life. She knows she's not alone.

In readiness for shrinking, Goldilocks went and turned the oven on, but then decided to use her heat tool instead.

She thought of taking photos of the shrinking teddy, but they went out the window as soon as she started because she struggled to control the sucker.

And then his ear stuck to his stomach.

And she burnt her fingers on the hot plastic.

And she plonked an acrylic block on the still-hot teddy and completely squashed his face.

She was not impressed...shrinking teddies in the oven wasn't ever this much trouble, she thought.


Goldie took a photo of Teddy number 1, feeling sorry for him the whole time.

And feeling sorry for her burnt fingers.

And feeling sorry for her silly crafty self because it's really not that hard to shrink a teddy.


Determined to be more prepared the second time, Goldie grabbed her trusty tweezers and then started shrinking Teddy number 2.

He cooperated a bit better, although she still squashed his face a bit. And left fingerprints in it.

She never was good at watching paint dry.


Goldilocks thought she was over the shrinking at this point.

Suddenly it was clear to her why the shrink plastic had stayed in the cupboard for all those years.

She couldn't believe the bits of fluff that had gotten themselves stuck in the drying plastic. That never happened in the oven...

She was also annoyed at the crack she made in Teddy number 1. Did she mention that?

She also worked out it wasn't a good idea to shrink things on her rubber mat.

Rubber kinda melts.

Her mat didn't melt, but it definitely softened somewhat.

Goldie decided to take a photo of the original-sized teddy shape, so she could finally go each lunch. She remembered the oven was on. Far out.

And then...

...she decided to try one last time.

Third time's the charm, they say.

Goldie picked up the heat tool to get going and accidentally touched the steel bit at the top...yeow. Burnt fingers...again.

Goldie rolled her eyes and firmly decided that a piece of shrink plastic and a heat tool were not going to beat her and she tried for the charm.


She got it. Goldie had much better luck with Teddy number 3.

He cooperated.

Goldie didn't burn her fingers.

He flattened himself out.

He turned out okay.

Unfortunately though, he had the worse drawn face of the lot, so he was a big disappointment.

(sigh)

The teddy shrinking experiment was teetering on the brink of disaster.

Goldilocks felt defeated.

She decided to write the blog post anyway because something can always be learnt from these things. She wrote and added photos and then got to the 'brink of disaster' bit. Brilliant, she thought, another disaster. First the overloaded card and now this.

And then she looked at the teddies sitting in front of her and realised they weren't a disaster after all.


Number 1 looked squashed, but he was smiling at her.

Number 2 looked kinda cute actually.

Number 3 was a little weird in the eyes, so he stayed a disappointment.

Two outta three wasn't bad even with their squashed faces, fingerprints, cracks and fluff bits.

Goldie marvelled at her ability to turn something from bad to good so quickly and then left the computer to go finally have lunch of an open sandwich in the oven...

...with her little finger still smarting from that darn heat tool.

20 May 2011

Just a bit of punch art for ya...

...and it's a different sort - they're some of my teaching materials. 

I don't use them anymore because I don't teach Basic classes much now, but they were very useful back in the day. 

Actually, these are my second version. I have an older version and they got hammered. How many times they got whipped out and passed around in class is beyond me.  


Have you tried any of these things?

You know how old it is because of the chalks. Chalks aren't around much now, but the used to be huge, remember that? I'm sure some ladies still have them and use them, but they're not in like they used to be.

And the Shrinkies! See those?

Have you ever shrunk a teddy in the oven? So fun watching it curl up and flatten. We used to do it with chip packets as kids.

The shrinkie teddies (above) used to be the size of the brown teddy (below). So fun. If you have a go, draw the face on first with permanent pen like a Nikko and do the fabric paint after.

I'm not sure where you can buy Shrink paper, but I'm sure it's out there.

Just did a quick search and here's some for ya.

Meanwhile I'm going to check my cupboard and see if I've still got some. You can use your heat tool to shrink them too, not just the oven. It's pretty fun, esp if you make teddies or something cute.


Here's the second sheet of bits and bobs. I used to show the ladies all the different things you can use with punch art to jazz it up a bit. I still use lots of things here...buttons, Dimensional Magic...I'll list them...

Things I still use:
Foam tape (all the time)
Brads
Dimensional Magic
Glitter glue - Stickles in Crystal mainly
Drawing
Deco scissors
Buttons

Things I don't:
Drawn stitching
Spread paint
Chalking
Any decorations
Pin pricking
Shrinkies (but I'm going to check cupboard)
Embossing
Flock
Those types of tags with the metal edges
Eyelets (does anybody much?)

Things I use sometimes:
Paint for bears
Ribbon (but not like that as a bow)

Things I use instead:
Tracing tool for faux stitching


Things I use all the time:
Punches because they rock.

Things I hope I won't ever stop using:
Punches because they rock.

Things I like using with punches:
Dies because they rock too.

Things that I have an unexplainable love for - sometimes so much so that even I think it's ridiculous:
Punches and dies.

What I'm going to do now:
Check the cupboard for Shrinky Dinks

And?

Yep, found some. I've got white and Almond. The Almond is what the teddies are in up there. I'm planning on putting an open sandwich in the oven for lunch, so maybe some teddies will go in there too. Ha ha.

Punch on!

19 May 2011

Revamp, redo, repeat or recycle - Flower part 2

Hi again, 

Back as promised with some more Recycle-y Revamps today :o)


Original card....


Ooooh, totally loving the orange. 

It's just so orange. 


Totally loving that pink button. 

Nice shot of colour. 


Got this handmade paper from PC - they have some interesting stuff over there. 

Their die cutting sale is going strong. Seen or used the new Cuttlebug machine

I used it properly for the first time over at PC on the weekend and liked it. The handle's definitely different, but it didn't cause a problem or make it hard to use or anything. I thought it might because it folds in and makes the turning part different to the old one. 

Anyway, it was good and I love the cream with the green.  


Last card with a big orange button. Nice. 

Gotta say, I do my best to take good photos of these cards (annoys me when I can't or when the light isn't right) and yet they don't always translate in the photos. I'm looking at these now going, "They look so much better in real life." So much so that I want to sit down and make a whole other set! 

Oh yes, the paper collection is Madame Royale from We R Memory Keepers - love the glitter in it.  

Cheater Peter - the yellow spotty paper in the one above (and the one above that) isn't from this collection, it's from Modern Homemaker by October Afternoon (the Party Line paper). I did a redo using that collection too. 

I know, a lotta redos, but once I started I just kept going. 

It's all fun. Will share that MH card soon, bye now!

:o)

18 May 2011

Revamp, redo, repeat or recycle - Flower part 1

Howdy partners, 

I'm back with the reduce, reuse, recycle card today. 

I keep saying that in my head instead of the proper four Rs. 

Revamp. This is a revamp?

Redo. No, it's not a redo. A redo is a total copy of the original. 

Repeat - I guess that's a total copy of the original too. 

Recycle - I think that's using parts of the original to make a new card. 

Gosh, I made this up and I don't know what any of it is. 


Here's the original card. 

And I've decided to call my new ones Recycle-y Revamps.

Hardy, ha ha. 


Note the sentiment...

Yep, right on, sisters. 


The collection of paper is actually an Easter collection. 

I didn't get to use it for Easter stuff (too busy making chicks and rabbits), so I thought I'd use the generic patterns in the pad to make regular cards. 


I had the 12 x 12 Scrapbook Pad to work with. It came with some letters and bits in the back, but I just stuck with the papers. Pretty typical of me. 


The little letter stickers are from My Little Shoebox and Cosmo Cricket (pink ones). Love having a stash of these stickers - they're great.  

Did you check out the My Little Shoebox ones? They have tonnes of colours. Didn't know there was that many. Wow. 

Note the polka dotty envelopes too. Used the papers in the collection to make those on The Ultimate Crafters Companion - love that thing for envelopes. She starts making the envelopes at 7:06 (I linked you to a vid). 

Well, I hope you enjoyed, I've got more Recycle-y Revamps coming tomorrow!

17 May 2011

Ah, some nice cards this time...

Yes, up the top there I said some nice cards, but they are, in fact, the same card. 

The same card taken at different times of the year, that is. 


April, ie. autumn. 


September, ie. spring. 

Huge difference, hey? 

I don't alter my photos in Photoshop or anything tricky like that, what you see is what I took. I like the spring one the best because of the cosy, yellow glow. 


Yes, it's sideways. 

I like it.  


And I love that Donut Chain punch from EK. It totally rocks. 


I discovered this new die today. It's a Bigz one called Flower, 3D Fringed. What do you think? Looks kinda like my flower up there. 

When you're over on the Sizzix website, make sure you click on the grey 'line' icon on the left of the picture. See it? 

It shows you the actual graphic of the die cut. Only just discovered that myself. Makes life so much easier because some of those dies are hard to figure out when you just see the pic on the front.   

Now I didn't just post this card to talk about die and the time of year I took the photos, I posted it to show you the other cards it sparked. 

A repeat, if you will.

Repeats, actually. 

Remember the redo, repeat, revamp and re-something else concept that I've talked about before? 

Well, stay tuned more!

:o)

16 May 2011

A glitch and disasters

Hi there,

How are you this new week? The skies are still blue around here, although there's more clouds around. Hold it, there goes some thunder...extremely weird.

Blogger's been offline over the last little while - everything seems to be fixed now, but when I tried to get on at the end of last week...nothing, then nothing and then still nothing, so if you got on to see what was happening and found nothing, that's why. Oh well, it happens.

That was the glitch, now for the disaster.

Last week I had a disaster in my actual kitchen. Not my crafting kitchen, my actual kitchen.

Oh man, it was bad. 

The chicken was bad, the veges were burnt, the gravy was horrid.

It was just all around bad. So bad that I gave Andrew pies for dinner.

We keep some in the deep freeze for such emergencies. The emergency usually stems from no food in the house, not a bad dinner. I'm no great cook, but bad is bad no matter how to try to eat it. And I did try to eat it, and decided Andrew didn't need to suffer the same pain, thus the pies. He appreciated it.

Ever have kitchen disasters?

I remember something Mum made with off cheese when we were growing up. Phew...Or was it off milk? And Andrew remembers the smell of the tripe his mother (or was it father? Or father's request?) cooked. Double phew.

On the subject of disasters, I thought I'd show you a card disaster...

Ready?

It's bad....


Oh my word, it still makes me cringe.

If you've been around here a while, you'll know that this is totally not my style and is just. too. much. I'm not a pile it on kinda person and yet, this card is a pile it on kinda one. It's like three cards in one.

More thunder....it's just not normal for this time of day, year or anything else. And now I can hear raindrops. Sigh. Come back sun.

Back to the bad card....

Full disclosure - or an explanation of sorts....When I was making this card I had a tradesman here doing a pest inspection. I couldn't think straight because I had to be at the ready answer questions and move out of the way etc etc, so I just kept to my desk and kept making the same card. I kept adding to it and all of a sudden it looked like this.

I mean, I don't haaaate it, but I don't love it either. It's just not me. I think I might pull it apart. Not sure.

I did end up making a simpler version though. Had to.

My intention was to make a couple of simpler versions - one with the ticket bit and one with the flower bit. Only got to do the ticket bit one. Here it is...


Better.

Still not me.

But better.

Ah, crafting, it's always interesting!

I know how the contestants on Masterchef feel when they make a horrible dish...I've done it too...made a horrible dish (more than one in my cooking life) and a horrible card (more than one in my crafting life).

It's life. We make mistakes and we just move on. What else can you do?

Show everyone on your blog! ha ha.

:o)

PS. Full thunder storm happening now and very heavy rain. I'm sure you're pleased you received the weather update ;o) that's a winking one....

PPS. Supplies and bits:

Paper - We R Memory Keepers Madam Royale - I love this paper, particularly because of the orange in it. And the glitter. Bought the pad of it at Photo Continental.

Punches - Butterfly with button on it - Martha. It's the Stamp and Punch Butterfly. Smaller butterflies were cut off the Monarch border/corner punch.

Scallop Border - Martha's Linked Trim. Or you could use Garden Trellis.

Other border wrapped around the ticket - Martha's Swirling Lace. Nice.

Ticket - I made myself. Cut it to size and trimmed corners using a circle punch.

Cream ticket is from this punch called Photo Labels (EK Success). I use this a lot.

Scatter Joy stamp - I bought it from PC.


PPPS. Even though it totally overloaded the card, it's still a pretty flower, don't you think? Sizzix Layered Flowers #6. 

Yep, PC again. They have 20% off all die cutting/embossing stuff in May. Nice one.

12 May 2011

Outside my window today...

...there are blue, blue skies and trees blowing in the wind even though they don't look like it here. 


See the clouds? 


Exactly, there are none. 

I love May, it's my favourite month. 

It's properly autumn (no leaves turning different colours around here though) and the weather is just glorious. 


And this fella. 

He's always at the ready for a game of ball, even after an hour's walk around the neighbourhood where he sniffed at every leaf and twig and went to the toilet seven times at least (far out, yes, Cody, mark all the electricity boxes as yours). 

Right now, as in now, he's sleeping, but if I get up from the chair he'll run around to the shoe box and make it known that he wants me to take the ball out and chuck it around. I told Andrew it's how he relates to us and loves us. I'm okay with it. The simple things make him happy, so who am I to say no? 


Proof! 

(Gotta replace that green ball. Green ball and green grass = making it harder than it needs to be)

:o) 

11 May 2011

Flashback

Hey there to you, what's happening?

Thought I'd share a flashback today. I'm not afraid to show you my old stuff on here because I'm all about teaching and I think we can learn things from the stuff we used to do.

Take the card below for example, I wouldn't sit down and make something like this now, but I certainly made a lot of them back in the day.

And they were good...back in the day.

They were smile-inducing back in the day too. Still are today, with a tiny bit of cringe, but like I said, not afraid to show you where I came from.


This card is from circa 2001 - just guessing, but that's what circa means anyway.

Gold fabric paint, and bronze for the ears, were huge back then in this crafting kitchen. They're not huge now, but I'd still use them on a bear. Yes, yes, I would. After doing it for years, I don't think I could not add the paint. The bears would look...well, naked.

Things I would do differently on this card now:

1. Pull back on the stars. And maybe add another of a different size.

2. Do them with some orange and pink thrown in.

3. Use a lighter blue and green.

4. Change the bows on the bears, they're huge.

5. Reduce the amount of squiggle on the bows. I'd try it in black. I'd maybe leave it off altogether. Can't talk about these things, have to do them to truly see what works. That's how I make decisions with punch art. I punch it out and try it, it's the best way.

6. I'd make the noses smaller on the bears...they look like koala bear noses, maybe they were meant to be. Nope, no, they were not.

7. I'd reduce the size of the writing because I know I just don't write that big now.

8. I'd do little strokes (vertical) for the eyes, rather than dots sorta. Do them differently now.

And that's it.

The one thing that I did back then, that I would do tomorrow, and every other day of my punch art life, is use my very favourite cream card for the card base.

Honestly, if that stuff ever went out of production...well, I don't want to think about it....

Ever look at your older cards and redo them? Or just see how you've moved on? A little cringe every now and again keeps us honest, so don't worry about it.

:o)

09 May 2011

Mother's Day bits and pieces


Hi there ladies!

I thought I'd share the bits and pieces I made for Mother's Day with you today.

Now, before you say, 'gosh, does this girl ever stop crafting', let me tell you I had no intention of making anything.

Okay, not totally true. I did think of making the cards, of course I did.

I had ideas, I had thoughts, but I also had doubts. Doubts about pressure and time and having to be creative - all that. I mean, I love making cards, but the fun goes out of it when I have to do it under pressure. Totally...

So.....I ended up buying the cards. 

Yep, I walked into the store and saw the display and thought, "There are some pretty ones here, I'll just take a look" and then ended up putting two in my basket.

I've said it before and I'll say it again on behalf of all of us...

1. Just because we make cards doesn't mean we have to make every one we give out.

2. If we don't want to make a card (or can't), it's okay to just go and buy one.

3. If there's a type of card we need that's not our kinda thing, it's okay to buy it (ie. sympathy cards for me).

Okay, so I bought the cards. They were flowery, pretty and a bit glittery. I liked 'em.

We wrote on them, put them with the gifts and then I had a thought....

"Why not make a little banner to hang around the place?"

And then it started....


You know how it is. You get an idea, your eyes sparkle, you have a bit of time, you know what paper you want to use, you can totally see the finished product in your head and you just want to start there and then.

Well, luckily I had time to start there and then and I did. I pulled out the stuff and got to work. They were pretty simple and came together quite quickly at first...

And then it really started...

I added pop dots...

and borders...

I made flowers for Grandma's banner because I didn't like the hearts and then I ended up flicking the flowers because I didn't like them and went back to the hearts. It happens!

Anyway, I made the banners, I wasn't forced to and I had a great time. What else can you ask for from your crafting? Nothing...nothing at all.

I used The Girls Paperie Kitch collection including the big alphas from the sticker book, Papertrey Ink's Boxy Banner dies for the actual banner and some red and white Baker's twine from Divine Twine to tie it altogether. Again the Baker's twine rocked it. It always rocks it...

After all that s'plain'n, let's move onto the banners, shall we?

For my mother-in-law...


All packaged and ready to go.

See-through envelopes - so cool. Got them online here at Regal Craft a few years ago. 


Note the flower there - that's one of the ones I made for Grandma's banner that I flicked because it stuck up too much.

I was determined to use them somehow... :o)

Onto Grandma's banner...


I added a few borders along the tops of hers because there was a coordinating border sticker sheet in the sticker book that I wanted to use.

The one above isn't actually a sticker though because I ran out and had to make two paper borders instead. Grandma didn't notice.


This one's a sticker.


I actually had the foresight to add pop dots to the letters on hers. Pop dots always make things poppy.

I was kinda racing the clock to begin with and then I just stopped watching and embellished away (pop dots, borders). Don't you love it when you can do that?


Kept the packaging simple for her.

Easy is best when you're 89.

Unwrapped by the giver is best when you're 89 - I went that route...

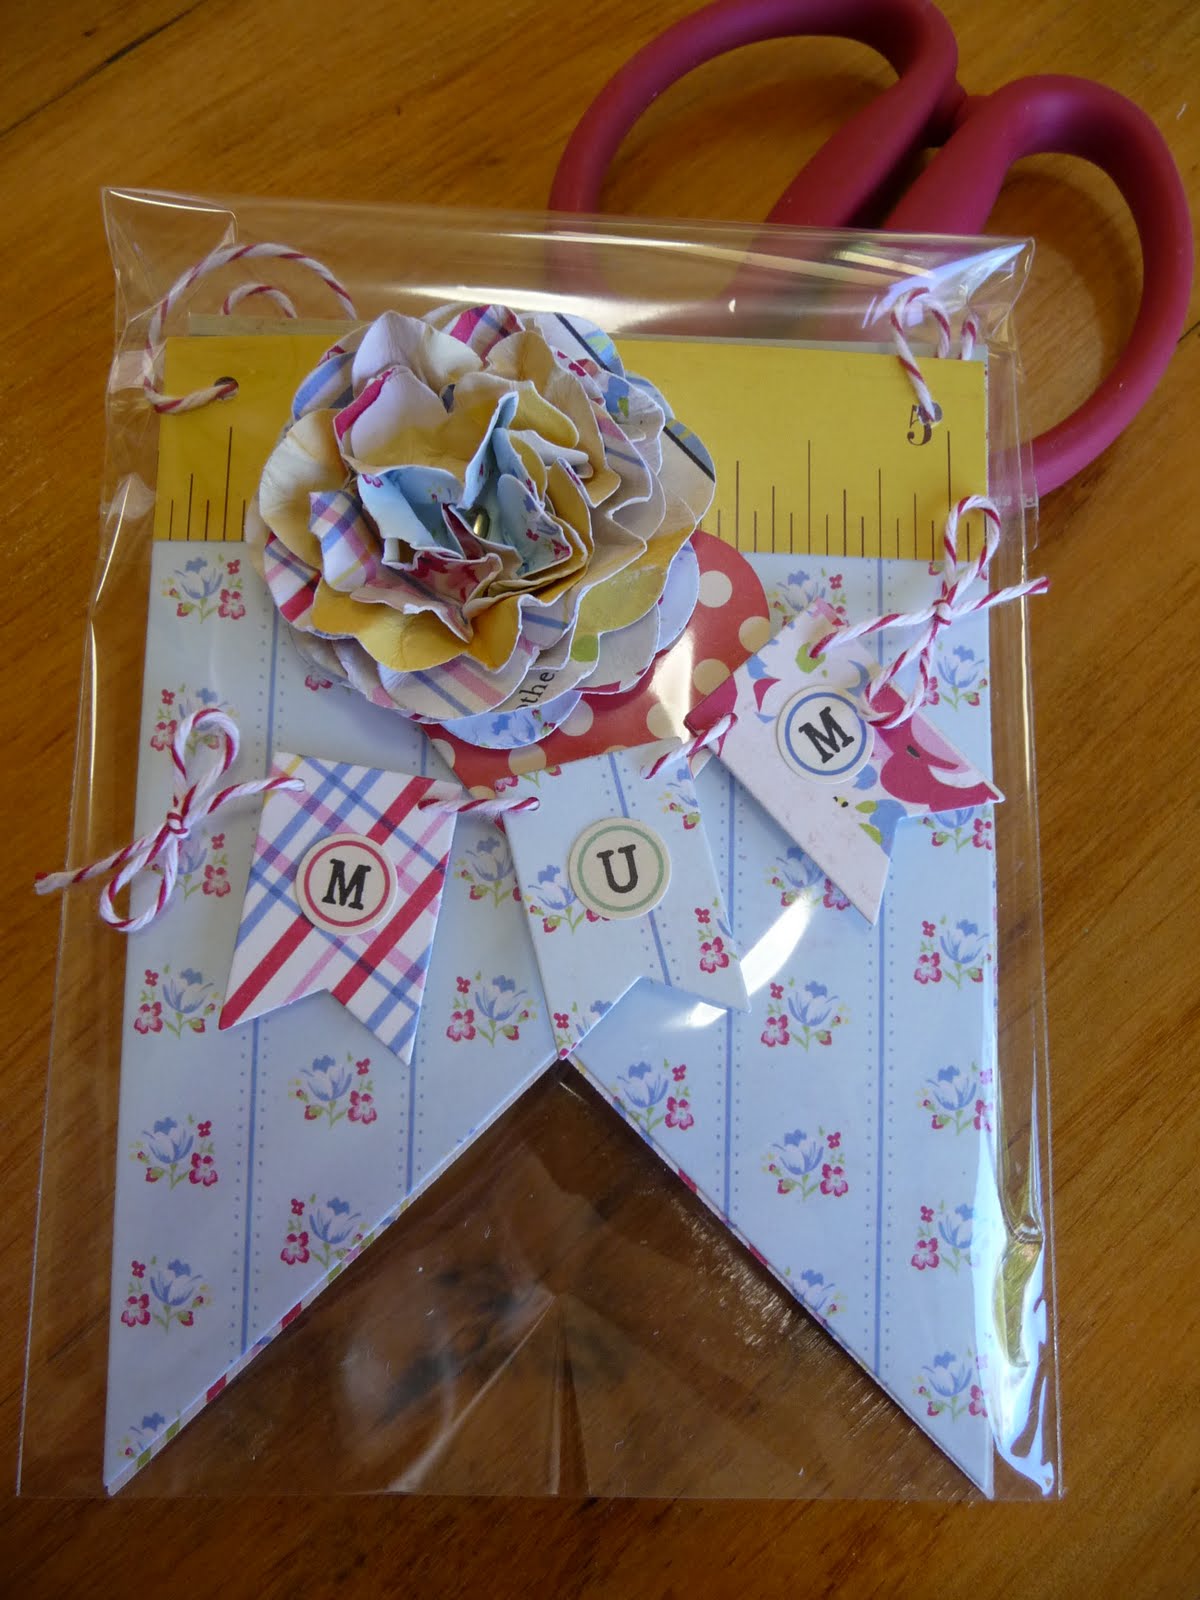
And this is Mum's banner...


The alpha stickers from the sticker book were limited in number, so I had to think of words that I could actually make. There was a page of numbers in the book too, so a few of the zeros got used for o's like that o up there.

Mother
Love
and
We love you (with a heart)
is what I got in the end. Not bad.


Mum's packaging.

Added a little banner to the front because I knew she'd enjoy it. I knew she'd probably pull it off and save it. And I knew she'd just like it.

And OH MY GOODNESS - I've just remembered the tag! I forgot the tag! I always make Mum a tag for her birthday, Mother's Day and Christmas and she keeps them all on a ring. Oh, rats, after doing it for a few years it's still not entrenched in my brain. Okay, must whip up something.

OR, because Mum's crafty....die cut an extra boxy banner and get her to stick the flower and the little banner to it. Score, that's what I'm going to do...problem thwarted...

Actually maybe I'll give that to her when I give her her second little gift. I bought something o/seas, but it didn't arrive in time.

Did I tell you that, Mum? You'll be getting something else from me.

Nothing like spreading out the gift giving is there?


Ooooh, I love these photos. They turned out so fab.

The little banner up there is a die set from My Favourite Things - they have great dies. And guess what? If you buy only dies or stamps they'll ship your order for $5.45 AUD. That's from the USA. Amazing. They have reasonable shipping rates if you buy other stuff - check it out. They release dies and stamps monthly too. And Kim is really nice.

Laaast thing - the little alphas stickers there are from October Afternoon. They're called Sticky Keys. So cute.

Veeery last thing - I got the Kitch papers and Sticky Keys from Blue Bazaar. Fab.

Feel like I've talked so much I've gotta keep quiet for the rest of the day...bye now!

PS. Threw the flower photo in for kicks.

PPS. Enough pics for ya, Sue?