Showing posts with label Flower cards. Show all posts

28 September 2011

Fairy Dust Glitter + Daily Junque part 3

Hi there, 

Thought I'd show this last glittery flowery card today - the last one that I have photographed anyway. 

This one's my favourite, I think. 

Except for the fact that there's a little too much white space at the top of the card there. About a cm needs to be cut from the top...didn't notice it when I was actually making the card. 


This card isn't on a regular card base - I just folded the actual paper in half and added Tim's On the Edge File Tabs die on the side there.

Works a treat, that die, and it cuts through chipboard and acetate and all the other things that the steel rule dies can cut through.

Mine's just the paper like I said, and what especially rocks with the steel rule dies is that they cut paper and chipboard as well as each other.

That is, thin and thick.

And it cuts them neatly.


Just a few close ups of the bits on the card front.

I didn't stamp on this card. I don't think I thought of it at the time.


Did do the compulsory flower though.

Mixed Berries Fairy Dust Glitter on this one.

And a pink button from my stash.

And there was a smile on my face when I was done - except for a second when I noticed the extra white space that I should've cut off.

Oh well, still love it anyway.

So, you bought any Fairy Dust glitter yet? lol

I know I'll be using mine a lot. I'm thinking more Christmas stuff next....I'm on the hunt for some fun Christmas papers...

27 September 2011

Fairy Dust Glitter + Daily Junque part 2

Thought I'd show you some more of the Daily Junque flowers again today. Can't say it enough - I've had so much fun with these papers....

What I've loved is the cards have almost made themselves. Gotta love that. Collage background with room for a flower and done! Nice card. 

For this card below, I cut the paper, stuck it to a regular card base and then added just two things:

1. The glitter flower with Pralines & Cream glitter. 


2. A line of white (heat embossed) stamping. Can you see it?


It's there, just above the wing...


And here at the point of the arrow.

It's a border stamp from Making Memories Panorama stamp set.

I know, who knew?

It just worked.

I found the set at Photo Continental - again, treasure trove over there.

Don't you love that bicycle image up there? I do. Just love it.

I've used the Panorama stamps on another of these cards too. The journalling block with the swirly ends specifically. One swirly end is poking out from behind the flower. Looks nice.


Onto card number two.

For this card I added the paper to a regular A5 card base again and then added four things:

1. Glitter flower with Mixed Berries glitter (added Dimensional Magic to the button to make it glossy).

(The die is Tim's Tattered Florals)

2. Vintage Floral border at the bottom (Martha punch).

3. An extra piece of the blue and white stripe at the bottom. Kinda looks like a blue and white barber pole.

4. Another stamp. This one says 'Note to Self' and is from Basic Grey's 'To Do' Stamp set. Again, just worked.


I'm a believer in buy what you like and it'll work for you. Don't try to hard, just pick up stuff you like and it'll gel in the end. 

Yep, I'm a believer in that.


Pretty.

Love that Mixed Berries glitter - it's just perfect on these papers (pinky blue).


Onto project number three...

A box.

With a flower on it.

1.  You can learn how to make a box like this here. 12 x 12 for one piece and 11 3/4 x 11 3/4 for the other piece.

2.  The tag is from the paper collection - I just cut it off one of the sheets.

3.  The die I used for the flower is the Flower Framelits from Sizzix again. I love the Framelits dies.

4.  The glitter is Pralines & Cream.

5.  There's nothing in the box.

6.  Boxes are hard to take a picture of.

Hope you enjoyed the projects!

The timer's gone off, so that means it's time to iron. I know, from blogging to ironing - what a mix. Don't worry, I'm going to put the timer on (for an hour) for that too.

Bye now!

PS. Yes I'm serious.

PPS. Trying to keep myself on task (or tasks) today. And the timer is today's 'keep Debra on task' motivator of choice.

23 September 2011

More Fairy Dust Glitter: Mixed Berries this time

Hi there,

I said I'd be back today with some more glittery projects. Are you ready?

Here's the first....(hello, baker's twine)...


Firstly, two words....Daily Junque.

I'll just let that sink in for a bit before I carry on....

...sinking in....

...sinking in....

Okay, has it sunk?

Has the fabness of the papers sunk into the recesses of  the 'I've gotta get to my desk and make something now' part of your brain?

This paper is just. so. fab.

Have a look here - just look at the papers - they're what I'm talking about....

As is typical, I don't like all the papers in the collection. I know, what a downer, but it's the way I roll. The rocking it ones are the collage ones.

What do you think? Now I know that sometimes things don't translate onto the computer screen and sometimes our tastes are different, but you've gotta believe me when I say that this paper is fab. Like, it totally rocks.

I found it at PC (that place is a treasure trove) and snapped it up quickity sticks. I'd seen it online when it first came out, but I didn't buy any even though I liked it. This time though, I needed some paper for some projects and whammo, it came home with me.

I got stuck into it as soon as I could and ended up having a great time with it. Can you have a great time with paper? Yes, you can.

You know what it's like, it all just snaps and clicks and works and you think you're the greatest card maker ever because everything you touch turns to gold??

Yep, it was like that.

And that...is called inspiration...

...which is opposed to non-inspiration or wrong timing, which is more commonly called 'get outta here now and go do something else'...

Yep, been there so many times I've left my toothbrush for extended visits.

Anyway, Daily Junque and I were on the inspiration train and we rocked it. I love it when that happens. If only it was that easy all the time.

We rocked the glitter too.

Or the glitter rocked the papers!

Fabbo.

Hold it...we need a close up....


Gorgeous!

I used the Mixed Berries Fairy Dust Glitter here. Made the flower go from fun to fabulous.

This was the time I realised that Mixed Berries was made for pinky/blue pattern combos.

Yesterday I talked about using certain glitters on certain papers, but I have to tell you that I've since used all three colours (Mixed Berries, Pralines and Cream and Sugar Shimmer) on these papers and they all look gorgeous.

(I've now added a note about that in yesterday's glitter review post - blogging is a 'current' media, but it's also a gigantic filing system and someone will look up that review in the future)

The card is actually a card by the way. It's got a back on it and is standing up open like a regular card would.

Okay, that's all for today - will share a couple more glittery cards soon. Yep, got more to show ya. Bye now.

PS. The handbag is an XL Sizzix die called Album, Purse and the embossing folder is called Wild Poinsettia from Couture Creations (got it at the show for five bucks...from Photo Continental, of course).

PPS. I was at my desk yesterday making some more cards like these and I had to work at it. The inspiration was still there, but the golden touch wasn't! That's craft...it ebbs and flows...

10 August 2011

Another daisy card...or two...

...but this time using daisy buttons as I call them. 

Circles (lots of sizes) and daisies - two types of punches - it's amazing what you can do. 

The bigger circles are an 1/8 of an inch apart. 3/4" on 7/8" or 7/8" on 1" depending on the size of your daisy punch. 

The little circles are 3/16". 

And the swirl is hand drawn. 

I think I'm going to try Copic Multiliners as another black pen option. A good black pen is essential to doing nice pen detail.  


The daisy buttons also look good all lined up.

Nice and easy. 

On page 10 of my first book I put three in a row by themselves, but later I decided five on a card would be nice. I've pumped out a few of these in my time. 

Enjoy!

29 June 2011

I've always loved this card...

...using a scrunched flower from Wendy Smedley.

You can use tissue paper too. Gorgeous.

I used my grandfather's hymnal.

No, not sacrilegious, but special.


If you look really closely you can see the faux stitching around the outside of the pink layer and through the middle of the leaves.

And if you look reeeaaally closely you can see Stickles glitter on the flower. See it?

Ah, nice.

This card makes me happy.

It's the unusual colour combination (for me), the lined paper and Grandpa's hymnal paper that makes it sing (ha ha...true) and feel calm all at the same time.

Click here to see how to make the flowers.

Enjoy!

31 August 2010

Really, it's not earth shattering...

...but it's pretty.

The story goes...I made a scrapbook page using all those papers, actually I made a few pages...and I had a lot of scraps left over as you do.

I decided to make a card out of the scraps to use them up and to just make a card. You know how people suggest these good ideas, but you rarely do them? Well, I rarely do them! Anyway, I decided to try this one.

It was good actually. I loved the papers and enjoyed making the card. There was no pressure to be fab or anything because I was just making a card to use up the scraps.


Turned out to be quite pretty actually. The brads are actually from My Mind's Eye's 2009 Colourful Christmas collection - they went perfectly with my papers. I think they're...actually, I don't know who they are. Pink Paislee? Not sure. The lined paper is an old one...I've had it for years. Coloured ledger.

I'd done the whole thing except the ribbon, that was last.

I had paper, brads (ie. metal and shine) and I needed some softness and some leaves. Cue ribbon and sorted. They're just bits folded in half to make loops and then stuck under the petals.


The card turned out nice in the end and I knew my class ladies would love it, so it ended up going in a class.

Don't you love it? No pressure to make a card and I get a good one. Sit down to make something fabulous for a class and come up with nothing!


Here's the class card. I re-designed it a bit to suit the papers/punches I had available for the class and it worked out better, I think.

Which do you like?

The differences are some of the papers, particularly the flower ones, the Fiskars Apron Lace punch got switched to the Open Scallop from EK and the red buttons.

The red buttons really do it for me and give the card some punch.

The first card could be punched up a notch with some red buttons too. Hey, you do what you do at the time!


Hmm, red buttons. We shall never be parted because we are friends.

And punches, we shall never be parted either because we are friends too.


And to finish off today I thought I'd show you my flower garden again. Remember it doesn't look like this now. These photos were taken in Dec 2008 (summer) about two weeks apart.

I remember enjoying watching them grow - so amazing. And I got to enjoy them from my house each day too - they were at the bottom of the garden (I sound English - been watching too much Escape to the Country). To be Aussie - they were down the backyard, mate.

Okay, that's all for today. Have a wonderful day!

30 August 2010

Total randomness...but with a theme.

Hi there,

I'm back from blog-o-cation! 

Did you miss me?

I missed you!

I'm still a bit out of it and my head's still trying to get into it. Thus, today's post. Randomness, but with a flowery theme :o)


These flowers were in my garden, but they're not anymore.

I wish they were.

My husband planted them for me and we had a good little garden going there for a while. We've realised in the southern hemisphere, and particularly in Queensland (the Sunshine State), Australia, we don't appreciate our flowers like you northern hemisphere dwellers. After going without them for so long after the snow and whatnot, I totally get the whole "give me some colour" thing!

In our state, we don't get snow. We had sleet inland once and it was very exciting. If we do get snow in our state it's a freak of nature. We have flowers all year round and we enjoy the sun all year round too. In fact, if there's too many overcast days in a row, we all start getting a bit peaked and gloomy. Not good! 

Flowers in the garden = good. 

Flowers in the garden that dog (Shep, not Cody) doesn't dig up = good. 

:o)


A flower card this time.

I noticed the swirls on the yellow there before. Looks like I tried to get some texture happening that's similar to embossing. Don't you just love embossing? Gosh, the Cuttlebug, love it! And what'd you think of the re-design? Interesting, hey? 


These flowers were taken in the northern hemisphere and in a very specific spot that I remember exactly.

Two words: Green Gables.


This card has a story, but I'll leave you hanging on that one too.

Sorry, it's mean, but I've gotta spread this stuff out otherwise my posts would be too long, even for me!


This card has a story too.

It's not an earth shattering one, but it's a story nonetheless.

And I'm going to share it tomorrow!

:o)

18 March 2010

Punch Art Fun - Look in the Book - page 14

Hi,

I'm back with another Look in the Book today.

We're on page 14 in the flower section and it's all about adding some personality to those flowers!

Hello, smiley faces!

Hello, smiley faces on everything including snails (do they smile, really?) and butterflies (do they smile, really?). They do on my desk!

The punches I've used here are Umes (Carl) and Vincas (also Carl), but you can use any flowers like these Sullivans ones. I've linked you to the range, so you can scroll through. They've got a six-petal one called Flower that'd be great.

And the yellow face a 3/4" Circle. Love that size.

You can use the flower/smiley face combo in many ways...

Simply...

More simply...

Simply with a few friends...

Simply with an addition of a tag...and a wink.


On a swirl...


Or with some smiling friends...

It doesn't matter how you use 'em, just use 'em, okay?

Oh yes, and aside from the flowers and the butterflies, note that the rest of the punches are...yep...that's right....

...flat spheres.

17 March 2010

Punch Art Fun 1 - Look in the Book - pages 12 and 13

Hey, howdy and hello to you,

Time for a Look in the Book today. A look at two pages - pages 12 and 13.

Got your book open?

We're still in the flower section of the book, so get ready for lots of flowers.

Ah, the sunflower... see the card on page 12? The pot's different, but the rest is the same.

The sunflower's made using the punch called Sun-A (Carl brand). Above I've put two together, with the right sides facing up, and the top one twisted to show the petals of the one underneath.

Now, Carl punches are hard to find in Australia, but Sullivans has a great range to choose from (and they're lever, fabbo). Click here to see a couple of suns in their range and then click on the "next" button at the bottom of the page to see the rest in that 25mm punch size.

Click here to see the entire Sullivans range if you'd like.

By the way, by right side I mean the side of the punch piece where the edges are curved up slightly.

To see what I mean, try this. Punch out a shape (one like a daisy is good) and put it flat on your desk. Now, turn it over a few times, putting down flat each time. You'll notice on one side the edges curve up, and on the other side, the edges curve down. Yes?

When they curve up - that's the right side, okay?

Remember this is the same for every punch piece - there is always a right and a wrong side.

That being said, there's no Punch Art police, so you're not going to get booked for using the wrong side of the punch piece, okay? What you do is completely up to you!

This one's on page 12 too, but I used used one flower here instead of two like as in the book.

And note the pot?

Pots, pots, pots. When I first started punch art, there were no pot punches, so I had to make my own by cutting circles in half, cutting them freehand and all sort of things like that. I'm loving the pot punches around now - so much easier.

The one above is actually quite a large pot punch, which I cut down in height to make it fit my flower. In the book I used a Cartoon Bubble for the pot.

See? Lots of pot options!

Oh, and another one. This is a pot punch again, but from a brand that doesn't exist anymore as far as I know. Emaginations...all their punches were burgundy. Remember them? Heard of them?

And that ladybug is a circle cut in half.

Circles are still the best punches - the most versatile, the most fab and the shape you need in every. single. size.

Like, every. single. size.

I cannot emphasise that enough.

There's three sizes of circles here and they've been used 12 times!

The head of the bee is a 3/16" Circle. I've used that one so much I've broken at least four of them over the years. And you know how much use they need before they break. Like, a LOT.

Circles - get 'em. Nuff said.

Above is a page in the little "Why I Like Punch Art" book I made a while ago. I posted the whole book a while ago too - you can see it under 22 July/24 July 2009 (Click on July's posts in the sidebar).

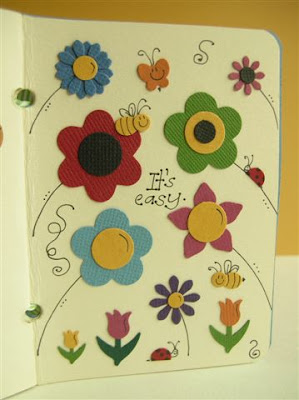
The card on page 13 is the original version of the idea. There's obviously a lot on the card, but it's fun to do more complicated things sometimes, hey?

And how many circles were used? My count is 42. Yours? (Remember I'm looking in the book here, not the card above)

This Kikyou is another lovely punch. I like lovely punches.

It's a Carl brand, but Sullivans has one the same called Petal, which you can see here (second from the bottom). It comes in lots of sizes - great for layering.

Here's some layering. We like punches in different sizes for exact applications such as these. Yes, yes, we do.

So, there's lots of flowers in the book, isn't there? They're always popular, so I designated six pages for them. Plus, I liked 'em and thought you might too!

Which are your favourites?

Okay, bye for now and see you tomorrow!

:o)

04 March 2010

Punch Art Fun 1 - Look in the Book - page 11

Hi,

I thought we'd have another Look in the Book today - at the flowers, that's where we are up to.

Got page 11 open?

This design is a simple flower border using flower punches.

In the book it's a horizontal design, but here it's a vertical design. Easy to tell it's a vertical one because of the reflection marks on the right. I'm right-handed, so they always go on the right for me.

Such an easy and fun design to do, this one. You can use any colours, although I do recommend the black middles to tie it altogether.

And here we have the legendary daisy chain. Legendary in my own mind because it's such a winner, you see.

Get your punches out, punch a bunch out in a bunch of different colours and start playing.

Those swirls take a bit to master, but you just have to be confident and go for it!

A tip for both of these cards?

Get all your flowers in position on your design before you glue any down. You'll invariably glue one and then want to move it, trust me!

And here we have a flower using two different sized balloon punches, a circle and some small tear drops.

See? You can make flowers out of anything! They're made from suns, eggs and snowflakes on the page too.

You can never go wrong with a few flowers, that's for sure.

:o)

PS. I always draw my swirls vertically, regardless of whether it's going to be a horizontal or vertical swirl on the finished card. Just easier for me. Might be for you too.