Okay, so here are the close up shots of the tree decorations as promised.
There's a lot, so I've divided them into sections to make it easier for all of us.
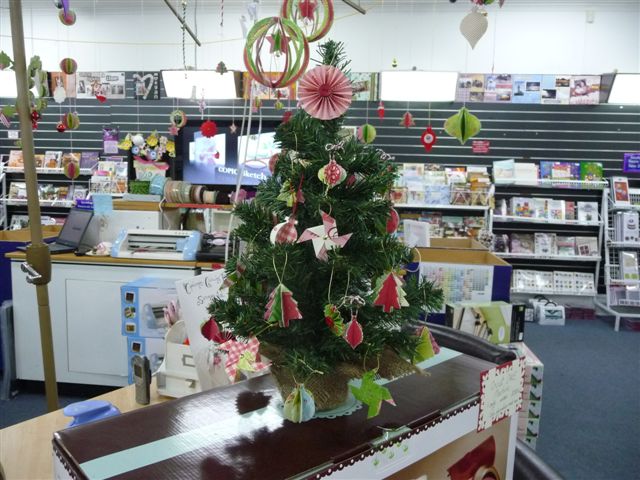
First, a reminder of the tree.
When I sat at my desk to decorate the tree, I'd been thinking about types of things I wanted to make for months. I'm always on the lookout for ideas and inspiration, so when I sit down to get started I'm not at a loss of what to do. Two things I knew I wanted to try were pinwheels and rosettes.
Pinwheels
I remember seeing some little pinwheels in a mag a couple of years ago, so I decided to make some for the tree. I've got the big Pinwheel Sizzix die, but it's too big for this tree. I'll use it for my big tree later though.
To make these:
~ Cut or punch a square in any size you want.
~ Cut slits from each corner about 2/3 of the way into the middle of the square.
~ Fold each point into the middle and hold them down with your finger.
~ Grab your paper piecing tool and push a hole through all the layers and put your brad in to secure.
~ Punch a hole in the top and add string.
Check out this video here if you'd like a visual. Thanks, Dawn. By the way, she scored the lines, I didn't do that, I just went for it. She also added adhesive to the corners, I didn't do that either because mine were too small to have puffy, so I flattened them, which made it easier to get the brad in too.
Anyway, give 'em a try!
Paper Rosettes
I've taught these in class before, but that was before I had a scoring board. All the folding was so hard on our fingers that we decided one was enough! Class ladies, remember that?
To make these:
~ Use your scoring board!
~ Buy yourself one if you don't have one because they're so fab. There's the Scor-Pal (comes in Imperial and Metric) and the Martha Stewart Scoring Board (Imperial only).
~ Cut your paper to any width you want.
~ Leave it plain, or punch the edge with your favourite border punch. It's fun to try different designs. I'd seen rounded ones before and decided I could use a border punch to do that. You could also use decorative scissors. Then I decided to try lots of different borders - so fun!
~ Use your scoring board to score all the lines you need. If you're leaving it plain, score the lines 1/2 cm apart. If you're jazzing it up with a border, score in between the pattern of your punch.
~ Accordian fold on all the lines.
~ Join together to make a ring. I used glue here.
~ Stand up on table (not you, the rosette) and push down in the centre to make the flower.
~ Glue it to a circle to secure. I used hot glue.
~ Decorate as desired.
~ Punch a hole in the top and add string.
Check this video here if you need a visual - I bet you will. I did. It's from Split Coast Stampers. Note she showed a double flower at the end. Niiice!
Oooh, String Lace Combo from Martha Stewart. This was as surprise package. Didn't think it'd turn out so pretty.
Scallop Dots by Martha.
Zig zag edger by Martha. This one would've been better on a wider piece of paper - maybe about 4" instead of the 2" here. Would've made a big ornament though, so it would've been moved to my big tree. I'll be making one of these for the big tree - I want to.
By the way, all my rosettes are 12" by something. The something depended on how wide my scraps were basically.
Lace Heart by Martha.
They're all by Martha!
Daisy by guess who?
Eyelet Lace Combo (combo means it comes in a set and has a corner one with it) by Martha.
Vintage Lace by the lace queen.
Basically what I'm saying here is get all your borders out and give 'em a go. Some I thought I would like, I wasn't too fussed with. And some I thought I wouldn't be too fussed with, I liked.
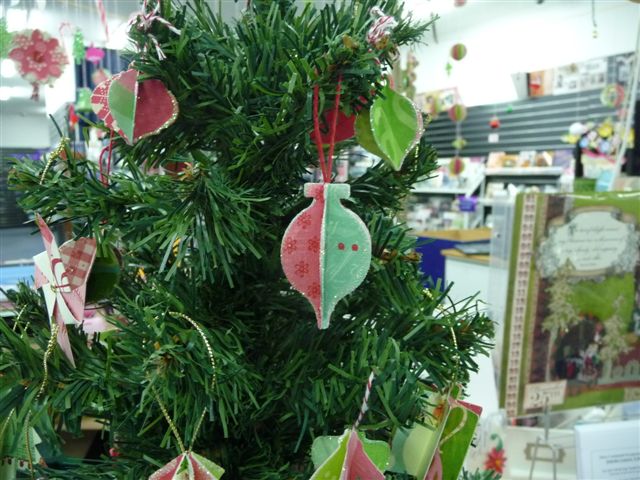
3D Ornaments
Last year's tree was mainly 3D ornaments - circles and scallops.
This year I knew I had to try the same thing with the new Christmas shapes from the M lady. And then that led to other shapes. It was like a big snowball, it got bigger and I just went along with it!
How to make these:
~ Choose your punch and punch out 5, 7 or 9 of them. An odd number is good and the amount depends on how busy you want it to be. And how much time you have.
~ Fold them all in half.
~ Glue one to the other.
~ Add your string and glue it up to close it.
~ Done!
Check out this video here if you need a visual. Angie was the one who taught me how to make the original ones two years ago, so thanks, Angie.
The one on the left is Vintage Doily by Martha. Perfect ornament! The one on the right is a scallop square from EK Success - remember the scallop square ornament...
Above I used a set of four Cuttlebug dies called Charms. They look just like ornaments. And they come with a ready made hole for your string.
Some decs will need to have their string added before you close it up, some you can just thread it through the holes in the pattern.
Okay, so this is why I wanted you to remember the scallop square ornament. The one above is the same square, I just folded each one on the diagonal to shake it up a bit.
And this is a Sullivans tree punch. A tree on a tree. In the background on the left you can see another charm from Cuttlebug. It's a square one this time.
Last year I added a lot of glitter to the ornaments, this year I didn't. Some of the paper has glitter on it already and in the end I liked the ornaments the way they were - unadorned.
That's the jingle bell punch from MS there. Did all of those in yellow bling because they're bells after all.
In the background is a scallop from the Sizzix Scallops #2 die and in the foreground is another ornament punch from Martha. It's the one that comes with the stamps (but I don't use the stamps).
Oh yes, I'll mention it while I see it, I made the tinsel from red cardstock and used Martha's fringing scissors to cut it. I had this brilliant idea one night as I was heading off to bed and thought, "I can use those fringing scissors to make tinsel!" I'd seen some tinsel on an ad on the telly and I had a flash of inspiration. Of course I had to go to my room to try it out...
Tips for tinsel:
~ I used cardstock, but paper is better. It's more pliable. There's a bit of paper tinsel at the top of the tree.
~ Play around with how far you have to cut into your strip (about one and half inches wide). Cut too far in and your tinsel will be flimsy. Don't cut far enough and it won't twist properly.
~ Try using crepe paper. Red crepe paper.
~ Use a stapler (Tiny Attacher from Tim Holtz is good because the staples are tiny) to attach your lengths together. Or glue for a firmer hold.
~ Don't make your lengths too long, you'll get 'em tangled up!
The punch on the left there is an ornament one from Sullivans. I don't know the name of it, but it's the blue size, the only size it comes in.
Vintage Ornament from Martha. It's bigger than the Vintage Doily.
Here you can see a circle I glued on the back of a rosette. Mine were never centred.
I tried to use the same colour as the rosette, but I had other fish to fry with all the gluing going on, so they rarely matched. Handmade, people, handmade!
The Topper
I did the topper last, because I didn't know what I wanted to do, so I crossed that bridge when I came to it.
When I made the first String Lace ornament, I liked it so much I decided to use it as the topper. Plus, I didn't have a star big enough to make a 3D topper from, which is what I wanted to do.
So it would look good from both sides, I made two ornaments and stuck them on a square cylinder I made. Is there such a thing as a square cylinder? It's the only way I can describe it. Works really well and the topper can be slipped on and off easily.
Here's the cylinder. Five sections, two end ones overlapped and glued to make the four sides.
And the last thing - another Merry word. I made this the same way as the one from yesterday. It has Dimensional Magic on it too.
The only thing is, I wish it was in the red and white gingham paper rather than this one. No matter, it's staying. It's tied to the tree now too because I don't want to lose it on the way over to PC.
Oh, you can see the paper tinsel there too. It's creamy coloured. That was my test attempt. I threw it on the tree to see what it looked like and it just stayed there.
It's not like you haven't seen this enough times already, but here's the tree again. It's nice to finish off with a full shot and a full head of knowledge of how to make everything, don't you think?
I hope I've inspired you to have a go at making some of your own ornaments this year. Andrew walked into my room the other night and saw the tree again. He said he wanted to take it to work. I said, "It's going to my work!" but I did think maybe I could scout around KMart or somewhere to see if I could find a little tree I could get for him and decorate. The other option is our old tree - it's about a metre high. A bit big for his desk though...
Oh yes, get this, Andrew sat at my desk with me the other night and made three ornaments! Can you believe that? He's such a treasure, my husband. He was watching Top Gear, so the night was still manly for him :o)
Well, I hope you enjoyed the tree. Thanks for coming to see me today. You have a great day now!