Showing posts with label Easter projects. Show all posts
20 April 2011
Easter Projects - Special Delivery
Hi there!
(Sorry, I'm at a real loss as to how to start these posts...hi just always seems appropriate)
I think this may be the last of the Easter projects today. There's been so many, I know.
This one's a tag card.
Like the egg cards, I folded the card base first and then put the fold just inside the die edge before I die cut the tag.
Cute, huh? I love this technique and it's so easy.
I tied the baker's twine on just the front part of the tag. I had visions of the recipient ripping the card apart if it was tied together. Not good.
I thought it'd be good to put the sentiment on the white egg this time.
As you do, I looked through my stamps and found this one in a postmark/stamp/envelope/travel set I had. Thought it worked well for the egg. "Fragile" was the other option. Both looked good, but I chose this one.
Again I cut the fringed grass myself - takes a little while, but it's worth it.
If I made this card again, I'd shift that pink egg over to the right just a tad, or put another smaller egg in there.
Like I said above, I love this technique. Turns all those die shapes into card bases if you know what I mean. So great.
That's what I love about punches and dies, they're so versatile, and all you can ever do is find new ways to use them. Suits me.
Well, that's the end of all the Easter projects for this year and just in time for Easter too. Hope you enjoyed them all feel inspired to make some of your own.
Happy Easter, everyone!
19 April 2011
Easter Projects - A big card
....for when you've got a lot to say, you want to make a big impact or you just want to use the huge oval die that you're lovin' right now :o)
Yes, it's a biggie!
A big card (A5 front) and a big egg. Makes sense.
I used the clear oval die and the paper is handmade paper that I got in a pack from PC. They do have some interesting stuff over there. I thought it made nice eggs.
Did a bit of embossing here to match the embossed paper.
The blue one is a spotty one (no name) from EZ-Cut (got it from PC). And the second is Candy Cane Stripes from Cuttlebug.
Scallop oval punch (blue size from Sullivans) - told you Scalloped ovals were a theme this Easter. With the pink hearts too.
I find my designing is like that - things follow a theme. I think it's meant to happen that way.
And to finish...
The huge cutie patootie rabbit card that you've seen before, but I couldn't resist putting in again.
I love seeing it nestled in the grass with the egg in front.
Wanted to show you the die I used for the card base above - it's called Card, Scallop. Sometimes seeing the pic on the front helps to identify it when shopping.
Okay, that's all for today!
18 April 2011
Easter Projects - An easel card
Hi there,
Did you have a good weekend?
I've got something a little different to show you today. It's an easel card.
Have you ever made one before? This is my first. I don't know where I saw it, but I ended up googling "how to make an easel card" on You Tube and a video came up (don't you love You Tube?).
Here's the video I watched. (Her card is 4 1/4 square - I just used a regular-sized A5 card base and folded it as usual)
Easy, hey?
They're a bit of fun, good for display and still fold flat for mailing. Triple win.
Oh yes, before I forget, here's a pic of the Loopy punch from Martha.
See the blue pic on the top of the box? All the loops look a little much up there, but toned down a bit, they're great.
Sometimes you don't have to go all out with these punches and do them all over the page to get a good look.
Totally goes with my paring down theme of late...
Here's my attempt at closing the card for mailing.
It was so used to sitting up that it wouldn't stay flat. You get the idea though.
I reckon you'd have to send instructions for your recipient, so they'd know how to display it, yes? Just because we know it's an easel card doesn't mean they do.
Used the fab scallop oval die for the frame again.
Lovin' it, lovin' it.
And here's the easel part.
You know, I watched the video and made the card, but as I sit here and type I don't know if I could go and make one again without racking my brain as to what to do. I'm going to watch the video again just to cement it in there, I think.
Okay, enjoy the card and your day :o) Bye now!
17 April 2011
Easter Projects - Second tray with cards
Hi there fellow crafters!
More Easter projects coming your way today. I know, it's unusual for me to post on the weekends, but Easter's coming and I wanted to get these up for you!
Okay, so today I'm showing you the second tray I did with cards and bits in it. You'll notice above that the trays are different.
Hmmm, the first one, with the rectangular cards at the back, was annoying me because every time I moved the tray they'd fall over. I tried to make it work, but eventually just decided to flick 'em outta there and replace them with a horizontal card.
So much better.
Here's the tray on display at Photo Continental. Look at all those punches lined up on the wall there :o)
Okay, let's take a look at the cards, shall we?
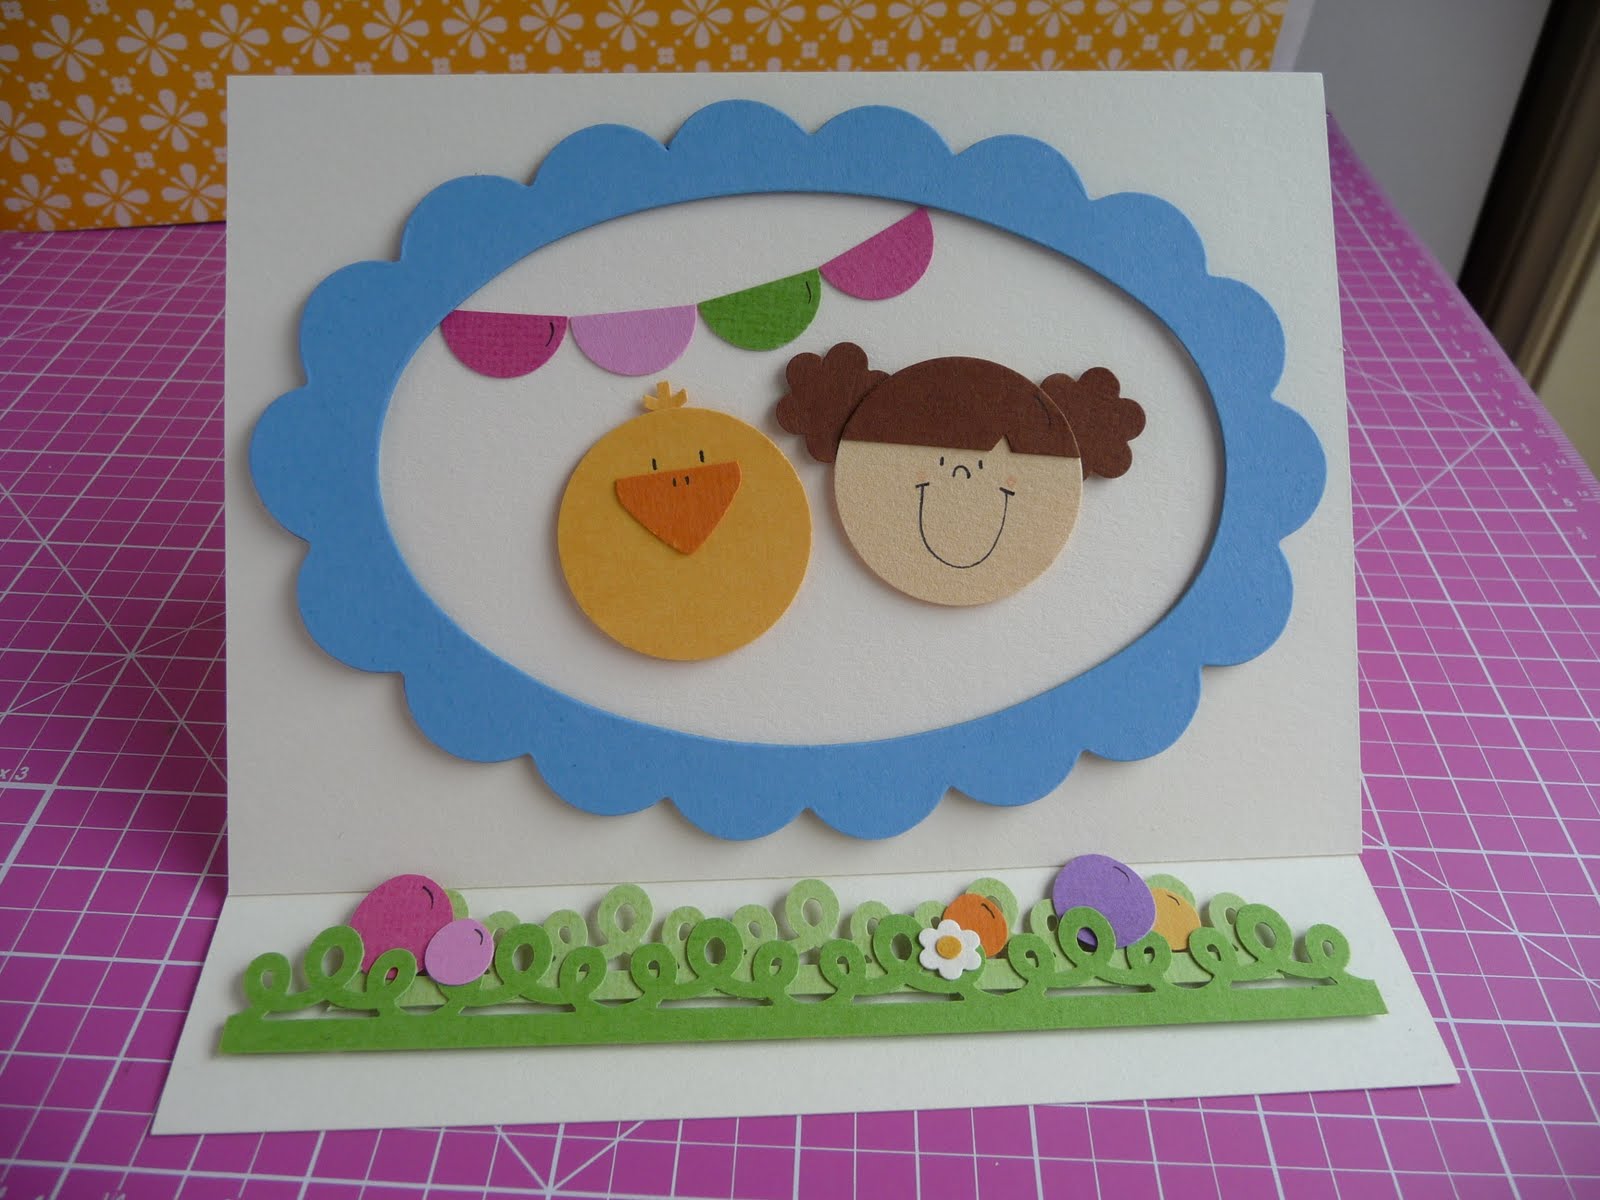
Lovin' these ovals right now.
Knew they'd come into their own at some point...
I decided to give the girlie a scalloped fringe this time using deco scissors. Like how it matches her curly ponytails. Flowers for ponytails are my fav for a girl.
Do you use your deco scissors at all? I still reach for mine after all these years....Remember when they went totally out of fashion and no one wanted a bar of them? Not me, I needed 'em for grass and water and fringes.
The trick with the scissors is to not get too excited with them. People used to shape their photos with them - that's getting a bit too excited in my opinion.
My deco scissors motto - a little bit goes a long way.
Oooh, love this one, but there's something missing...
You think so?
Usually I do three things on a card and above (with the girlie card) it's - girl, eggs with stitching and heart. For the one below below that we'll get to in a minute, it's bunny, flag and grass.
This one is animals, eggs and... nothing.
I knew it when I did it.
I knew it when I photographed it.
I knew it when I put it on display.
It's 98% there.
I didn't want to do grass again because I'd done that a lot.
I tried a flower, but it flung itself off the card.
I tried the pink heart, but there wasn't enough room, plus it just wasn't right for this card. The big pink egg was also on that side too, so it would've had to've been changed and then the domino effect would've started....you know how it is.
So I left it.
I knew it wasn't done...but I liked it anyway.
This is the thing. Designing takes a lot of time. None of these things take 5 mins. I'm sure you agree with me on that.
How many times have you sat down at your desk to make something and you've been totally stumped and had no great ideas?
Or you've gone there with a really great idea and it's worked, but it's taken hours to figure out?
Or you've (like me) done 98% of the card and then left it because you've not had the will to figure out the last 2%?
It happens.
I don't like it though - when it happens - when I've put a lot of effort into something and it's not exactly right. And I don't have the will to figure it out.
Crafting is not always about being exact, but sometimes it is. Trust me, I go for 70% a lot of the time (with my own stuff) because I'm not interested in being perfect.
But sometimes I want perfect.
Sometimes I want exact.
This is one of those times.
Well, it obviously wasn't when I decided it was finished, but it is now!
I'm going to mull this over - maybe the answer will pop into my head at some point. Probably when I'm washing the dishes or something like that.
Popped the chick's beak up on this card.
I never do that, but decided to because I always pop the rabbit's nose up.
Probably could've glossed it too.
Again, a great thought after the card's made and out of the house and out of my reach.
Just wanted to point out there is tracing tool around the edge of the cream.
Maybe that could be number three? Animals, eggs and tracing tool?
Nup, it's not and you know it, Debra.
:o(
Rats.
Just letting you know this is how I made the cards. Cut two ovals and creased the back one and glued the flap to the front one.
There's gotta be a name for this technique...
Ah, yes. Onto a card that's exact. It's perfect. It's kicking it.
I'm not tooting my own horn here, I'm just sayin'.
It's like those contestants on My Kitchen Rules - they know when their dish is kicking it and when it's not. They know when it's exact.
I know too, and this one is. It's a good feeling.
The three things (like I said above) are rabbit, flag and grass.
Things in threes are always good.
There are also three eggs. And three dark pink things. And three edges - loops (grass), pinking (flag) and scallops (frame).
Threes are good, good, good.
I love the white on the cream too. Nice.
Don't you love that scallop oval frame? (Sizzix Bigz die) I knew it'd be a good one to have something peeking out from behind it. The rabbit's not really peeking, he's just there, but still.
Again, ovals and scallops - so fun this Easter.
Oh, punch art, I love you!
And I am serious when I say that people...God, husband, family, friends, dog...and punch art - it's right up there. It just does it for me and it's the way it is. I love it, plain and simple.
And I do love it plain and simple. I love it when it's done, right on the money and at 100%.
I do not love it when it's over done, right over the money and at 110%. Not good.
Like, what's that lime on the plate for? It serves no purpose. Half the battle is knowing when to stop, don't you agree?
Wait 'til I show you a card I did that's totally over the top. I don't know what came over me that day, but it was bad!
Okay, enough yakking for today.
More Easter projects to come - if you can stand it.
:o)
PS. I've just had a thought. Maybe a baker's twine bow at the top might work...
16 April 2011
Easter Projects - Tray
Hi there,
I'm back with some more Easter projects today.
You may recognise the tray thing from the Valentine's Day display up there. Has come in really useful lately. I've had it for years and I love it, but I've never known what to do with it.
I knew I wanted to do some kind of display for the table in it, but nothing ever really came together until the Valentine's Day one. Finally. And then the Easter one fell into place too. Must've been the right time.
I've mentioned this before, but I got the (fabulous, I-couldn't-ask-for-anything-more) shred and the eggs from Spotlight.
So perfect.
I knew I wanted a sun and clouds (made from flower punches) on the handle to add to the scene. Worked well.
And would you believe that I added the bunting ages after the whole thing was done? The tray was sitting on the table for a couple of days in readiness to go over to Photo Continental and one day I just glanced at it and knew it needed bunting.
Back into the craft room I went to make it up. Didn't take long. I used blue and white baker's twine and a Diamond punch from The Punch Bunch folded over the string.
Cute, just the look I wanted.
Okay, onto the projects inside the tray.
Here's the oval die again - I used it for the next couple of cards below.
You've seen this fella.
Hey, chick.
Here's the rabbit this time.
I work with a lot of cream card and it was nice to make a white rabbit. Looks so fresh.
I used the same die as the chick card. Remember with the chick card I folded the card and put the fold inside the die edge to cut the oval card. Fun, try it.
This time I folded the card and put the fold at the top, just inside the die edge again. When I die cut it, the two bits were joined, but only by a bit (did it on purpose). I put a crease about two cms from the top on the back oval and glued that bit to the front one.
I then punched a hole and added the ribbon. The ribbon covers up the straight bit, which is why I did it.
I cut my own grass here. Martha has some fringing scissors that you could use for this purpose too. Note the tracing tool around the edge too - just finishes it off.
Onto another chick card...
It's two scallops glued together. I put a crease in the back one and glued just that flap to the front one.
I haven't embossed anything for a little while, so it was fun to do a bit on this card.
I added Stickles in the middle of the flowers to give it some sparkle.
Remember how I've talked about redoing, revamping, repeating or recycling designs lately?
This one is a redo.
I made it last year and the shape I used for the ears of the bunny are gone now. Sullivans bought out a fish punch and I knew it'd make great ears. Sorted.
Redo, thank you.
Another redo.
I'm totally into it.
Sometimes the card is just a goodie and needs to be revisited, don't you think?
And here are all the bits at Photo Continental.
Hope you're enjoying all the Easter projects.
Be back with more soon!
15 April 2011
Easter Projects - Banner
Hi there,
I've shown you a snippet of Easter projects I've done recently, but over the next couple of days (including the weekend) I'm going to show you a lot more.
I sooo enjoyed making all these things. All the happy, fun colours and the rabbits, kids and chicks. My kinda crafting, for sure.
And banners, my kinda crafting too. Even if they're hard to photograph!
Here's the banner.
Ah, so fun.
The string is blue and white baker's twine. Baker's twine always seems the best option because it gives a bit of colour, but not too much because it has white in it.
Here's the die I used.
It's a big XL one called Banner, Layered Oval Scallop (bought from Photo Continental). You can see the three layers in the pic there. I used the two biggest ones for my banner.
The thing with these dies is - I treat them like big punches, so being able to have a huge oval rocks my world.
And two scalloped ones too? Well, it's just too fab.
You'll notice the Martha Loopy border at the bottom there again. Told ya it got a work out this Easter!
I made the flags myself. The triangle is from the McGill ice cream punch that I have. I stuck it to the yellow layer and cut around it with pinking shears.
You can't really see it on the photo, but I've used the tracing tool around the cream.
Okay, you can see it here. See the little dots?
Triangle punch from ice cream punch again with Sullivans orange oval in the middle.
Remember I said that Sullivans has a yellow fish punch for the ears now?
I didn't have it when I made this, so I used the big, blue fish punch and cut it down. The pink part is the green fish punch.
Oh, cute.
This whole thing makes me totally happy.
If you'd like to see it in real life, it's on display over at Photo Continental now.
See you with more projects tomorrow!
:o)
Subscribe to:
Posts (Atom)