Showing posts with label cupcakes. Show all posts

01 October 2010

Birthdays and cupcakes...

Since we were talking about birthdays and cupcakes the other day, I thought I'd share these today.


Here is the cupcake I ate for my birthday this year.


Here is the cupcake my mum ate for my birthday this year.

Andrew and Dad ate cupcakes for my birthday this year too, but they don't take photos of their food. It's only us girls that do that.

My cupcake was yum.

We got them here (at Poppy Cakes). Nice.  


Thought I'd share this card too.

The background is Sugar Daddy, Bazzill Bling. Hello? Please don't stop making this stuff!

The layer is photocopied from one of my grandmother's recipe books (onto card).  


The bunting is Bazzill Bling again.

Hello again? Bazzill Bling, I need you!

This time I used both sides of the bling - the blingy part, and the brighter back part. So rich and yummy.

And the bunting is circles cut in half. Cut a goodie and use that one to cut all your others so they're all exactly the same size.

Love that graphic of the lady with the cake.


And here's the lead actor (the rest are supporting actors).

The lead actor is Cupcake in Scalloped Square using these two punches. Ice cream is McGill (now comes in a lever) and the second is from Sullivans (have always come in a lever).

(We like levers. We like them a lot)


The actual cupcake bit on the cupcake is Core-dinations card. The front is chocolate and the back is pink. Embossed it with Swiss Dots folder (Cuttlebug) and sanded to reveal the pink. Fun stuff.

The Scalloped Square itself is the back of Bling again - it's Feather Boa. Love that pink. It's so great for these cupcake cards.  

Red button to finish.

Red buttons rock, we know that.

And so do cupcake cards.

:o)


23 June 2010

Class timetable...

... is up on the left over there --------------------> :o)


Here are the details of the classes over on the Photo Continental site:

21 August Vintage Inspired class

18 September Man Cards class

All the rest (Christmas 2010 and Birthday Card Basics)

Just call (07) 3849 4422 if you'd like to book.

We always have a great time in class. Why not come and join us? I don't bite :o)

PS. The Happy Birthday is a Martha Stewart deep edger punch. It's a border, but I just cut out the words and use them as a phrase. When don't you need a Happy Birthday saying? Yep, it's a winner.

PPS. The butterfly at the top is Martha too. It's from the Monarch border or corner punch. Once again, I cut them off and use them as butterflies. They're pretty ones too.

PPS. And while we're on it - the pink border bit at the bottom is Martha called Modern Garland.

PPPS. What would we do without Martha?

PPPPS. The yellow ric rac is the EK Success Ric Rac border (ribbon) punch - punches out to make paper ribbon, rather than on the edge of the card. They're coming out with a lot more paper ribbon punches soon.

PPPPS. The cupcake is a big XL die from Sizzix. Nice. You can cut it so it folds and you put the cupcake into the base, but I've just used it as a flat shape.

05 March 2010

Silly Sunday

Hey there!

It's Friday, don't you just love Fridays? I do, because Andrew makes dinner!

What I'm more concerned with today though, is Sunday.

This Sunday (the 7th), Photo Continental is having a sale day. It only happens once a year, so it's a great chance for a bargain.


And the reason for having cupcakes in the post?

The whole sale day at PC is cupcake themed! I love cupcakes, so what a fun day it'll be.

Now, a couple of tips for you.

1. The doors open at 10 am and the registers start getting hammered at about 11 am. If you know what you want, you could duck in and out and get it quickly, I reckon. As long as you don't get distracted! Just suggesting here, but I'm basing that suggestion on what happened last year.

2. If you come later in the day, you'll miss the crowds, but you might also miss out on what you wanted to get.

3. Got a granny trolley? Gosh, I'd bring it. I'm not a granny and I've got one. Andrew and I walk the dog to the shops and I bring the milk and whatnot home in it. Remember vintage is in! Plus, my granny used to use one all the time and I love that memory. Granny trolleys are cool, alright?

4. Be prepared for crowds. It's a very busy day, but last year there was a chocolate station and a water station to keep you fed and watered while waiting in line. This year there might be a cupcake station, you never know!
Okay, have a wonderful weekend, whatever you're doing!

Bye now,

Debra

PS. Above I used the cupcake stamp set from Basic Grey's Nook and Pantry collection, a scallop punch from Marvy, the sprial edge border punch from EK Success, some ledger paper from Making Memories and some holographic embossing powder to make the glittery dots. The dots are a Stampin Up! roller stamp, but you could use any dotted background.

10 February 2010

Valentine's Day cards

Hello again everyone,

Today I have a couple of Valentine's Day cards to show you.

It's not as big a holiday over here as it is overseas, but we celebrate it nonetheless, just in a very understated Australian way. Like, laid back. Like, maybe too laid back, lol.

Here's a fun one. It's a favourite because it's got a cupcake on it. Just love 'em.

Supplies:

  • Cupcake punch - McGill
  • Scallop Square punch - Marvy (green)
  • Square punch - Marvy (purple)
  • Background - Cuttlebug Love Language Combo set (includes word dies and the hearts folder)
  • Stickles on the square

Love that hearts background - it's really sweet. I particularly like the grid backgrounds with a little design on them like this one.

Here's the cupcake punch - remember it? You get a star and a candle to use too.

A couple of tips:

- Because there's 5 things that need to be punched out in the design, it needs a good punch so it can work best. Be confident and give it a good one!

- Line your punch up in from the edge of the paper as far as it'll go and give it that good, solid punch with two hands. That is, punch quickly and it'll go through great. Too slow and it may not work.

- If you have your paper too close to the edge of the design, it can jam in your punch. This goes for other designs too, and other brands. Done that before? (It usually happens with the big designs)

Here's the envelope I made to go with the card. It's red Bazzill (Pomegranate - my favourite red), which is the same as the background red on the card.

I'm really into putting faux stamps on my envelopes nowadays...

How many years have I had that stamp punch? Oh, about 7, I suppose.

How many times have I used it on a card in those 7 years? Oh, about 7 (if I'm lucky), I suppose.

How many times have I used it recently? Stacks!

Will you be using it more in the future? Yep!

It's a keeper :o)

And the square inside is CP2: Square from Carl. Above the stamp punch is white and so's the square inside it. You can see the difference on the bottom card below. The stamp is red and the square inside is white.

Love that cupcake punch.

I posted this card a little while ago. Just wanted to remind you of it to show how versatile the punch is...and that you can make cupcakes using blue, yellow and orange if you want.

Here's the card again. Cute. Gosh, I love cute.

I don't believe I've ever used two different shades of red on a card before. Two blues - yep. Two greens - yep. Two yellows - definitely. Two reds - nup, until now.

Can't remember the name of the red - it's either Ruby Slipper or Red Devil.

Don't you love the Cuttlebug? Embossing is just so fun to add to a card.

This heart folder is obviously a perfect choice for Valentine's Day, so I had to break it out. And the words come from the Love Language Combo set from above.

Simple card that one, simple.

I am very much into scallop squares with something inside at the moment. Am going to make a few today for my sister-in-law who needs some thank you cards. I'll be using a Cuttlebug background and a scallop square - nice. And fun.

And lastly, the envelope to match.

I make all my envelopes on the Crafters Companion - it's the quickest way to make them, I've found. And quicker too because I've made templates for my most used envelope sizes, so I don't have to look them up in the book each time. Honestly, I can make an envelope in two minutes - it's so fab.

Okay, see you tomorrow!

:o)

22 January 2010

The yellow gingham

Hello and welcome to Friday on Punch Art Fun!

Remember the yellow gingham paper I said I liked?

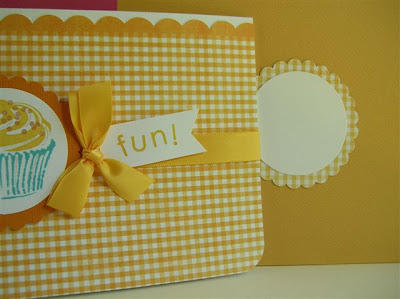
Here it is again. Wanted to keep a corner of it on the card, so I started with that as my base. I also rounded that bottom right hand corner too.

Then, the cupcake. Cute! It's a stamp set from Basic Grey's Nook and Pantry collection. So fun making your own cupcakes. There's sprinkles and different toppings. Kristina has a video where she used it too.


This time the card accepted some blue. Funny that. I tried blue to keep in with the summery theme. I know, you don't usually have blue cupcake bases...or do you? I guess you can.

One thing I've realised with all the cupcakes around the place - I make 'em, but I don't eat 'em. Not that I wouldn't eat one, I just don't cook them myself, so no cupcakes for me.


Now, what about a cupcake punch?

Oh, yes, please!

This one's a McGill punch and I asked the folks over there if I could share their images with you. They kindly said yes, so here you go.

I like how the packaging includes a couple of other ideas for the punches. Gets a few of the old creative juices flowing, you know?

You could also use the cupcake bit for ice cream and even hair. The cupcake holder bit is a good basket as they suggested, as well as a flower pot (with the pinking ridge cut off) or Christmas tree base.


Here's the card (and envelope) that I made using the punch.

Once again, the card accepted blue. Nice, thanks for that.

It's the same card design - one using the stamps, one using the punch. Which do you prefer?

I used some Smooch Spritz in Gold Glow on the yellow of the cupcake. It made it really shine - can you see it? Click here to see more colours. Photo Continental stocks it too. Check out some tips on how to use it here.

And for your viewing pleasure, here's some other punches in the range. I linked you over to these last week, or the week before. Fun stuff.


Well, that's it for today.

Have a great weekend!

:o)

15 August 2009

Cupcake prettiness

So if you'd like to make some cupcakes, here's some colour combinations to get you started. Sometimes it just helps to have a starting point, hey?

You'll recognise some of the combinations from previous blog entries, but having them in one place is good for future reference.

Don't forget to pull out your Cuttlebug! Fun stuff.


PS. Not all cupcakes have a cherry on top, but those ones I made purposely without anything look like they're missing a topper.

What do you reckon?

Chocolate cupcake

A quick idea.

Embossing is good, but remember you can sand it when you use Co-ordinations cardstock so the pattern comes to life. See bottom photo. The Co-ordinations colour is slightly different to the Bazzill brown I used, but you get the idea.


Will post some colour combinations a bit later to finish off the day, and the week!

14 August 2009

More cupcakes...why not?

Wanted to share more cupcake cards today. They're just so fun to make and easy too.

The good thing is that there are lots of variations so you can use what you have on hand. I've already showed you the Nestabilities ovals and scallops, but you can also use punches (of course! The cloud is used below) or just draw a pattern and cut it out.

Either, or preferably all, is good!


Hope you enjoy and that the pics are enticing you to make one too.

More tomorrow.

:o)

13 August 2009

They just keep coming...

Hello again, more cupcakes for you today!

This one below is an actual cupcake card. It's huge too. About 6 inches tall at least. I just traced around the shape to make the piece to put at the back to make the card open.


And here's some tiny ones. I realise you can't tell the difference in size as easily because of the photos, but these ones are about 2 inches tall (including the button). They're not cards either, they're magnets. So cute.

The one in the back is stuck to the top of a gift box. Remember the link to the gift boxes that Erin showed me how to make? It's one of those.

Don't you think this would make a cute gift? A little box of cupcake magnets.

At the moment they're sitting on my shelf in my room so I can look at them and enjoy them. After a while they'll go on the fridge and I'll look at them there. I like making pretty things to look at, do you?

11 August 2009

More cupcakes


Since we were talking about cupcakes yesterday, I thought I'd show you these today. They're the ones I did for my mum for Mother's Day this year. You'll recognise the Divine Swirl Cuttlebug folder on both. The card bases are String of Pearls Bazzill Bling - a nice background colour with a bit of shine of course. I put the glitter on the buttons. That's fun, you've gotta try it.
The card base is big - 6x6 square. Really into the big cards.

I always make my mum a tag for gift-giving occasions. That is, Mother's Day, her birthday and Christmas. She is collecting them on a ring and they're becoming a keepsake of bits and pieces I've given her over the years. It's just something special between her and I.

Love you, Mum.

10 August 2009

And to finish...

And lastly for today.

Remember how I said that this texture plate (top row, second from left) would be good for the cupcake card too? Well, I quickly made it this afternoon to see what it looked like.

Swirly!


Now there's three options.

Embossed cardstock from Bazzill, Divine Swirl embossing folder from Provo or the swirly texture plate from Fiskars.

Which is your favourite?

Cupcakes

Hello, and welcome to a new week. Feeling a little sad that winter is coming to an end. I like the cooler weather.

Today is cupcake day on the old blog. Cupcakes are good. Cupcakes are fun. Cupcakes top the "must make" list.

This is one version I made.

Supplies are:
Nestabilities Ovals and Scalloped Ovals
Ric Rac Scalloped Border (I pierced the design)
A small heart brad from Spotlight
Red button from my bag of buttons from Spotlight

The card base is Bazzill Bling Sugar Daddy. The photo doesn't show the shine at all, which is disappointing. And the other browns are Nutmeg and Swirlpool Geneva embossed cardstock.

Also cut a rectangle then trimmed to make the angle. That colour is either Glow or Harvest, either is good.

I ran the embossed cardstock through the Cuttlebug to make an embossed scalloped oval. That got glued to the regular oval with some of it overhanging the top, which got trimmed. The whole thing was adhered with foam tape. Wish you could see the bling background. It's so much better in real life.

As you can see too, the embossed cardstock is quite subtle. And that pierced swirl really is pretty.

**Whoa, just a side note. Have you ever just been typing away and accidently pressed some keys on the keyboard, and found yourself in a completely different window, and you don't know what you pressed to get there? I did just now! I think I was trying to do the shift key and a letter and got to a print preview page of this blog entry. Weird. I printed the page to get out of it and it worked. And then I deleted the print job. Funny thing is, the same thing happened when I was in Word before too, and now by buttons have swapped positions at the top. Don't know what I did, or how to fix. No probs, it's staying the way it is. :o)


Back to our regular programming...

Do you like the subtle look, or the Cuttlebug look? Here's another version using the Divine Swirl embossing folder. Sorry for the photo, not great, but I took it from this angle to show the embossing particularly. You can see the shine on the card base, but it's not that colour in real life.


To be subtle, or not subtle? That is the question...

And then you could throw this Fiskars texture plate into the mix and totally confuse the situation. Or not. Let's not get too dramatic, it's just crafting afterall. Remember the texture plates? Remember I bought the set for the swirly one? Hmm, would look nice too.

:o)