Showing posts with label Paper boxes. Show all posts

09 December 2009

Wednesday's Boxes

Today it's time for the fake presents under the tree.

You know, the ones that don't have any cash in them although we wish they did?

Yeah, those...

Firstly the supplies:

- All the papers are Bo Bunny and were found in the Christmas section of Photo Continental.

- Scor-Pal. You can buy one at Blue Bazaar under Tools.

- Ornaments die from Sizzix.

- Cuttlebug For You Bauble Cut and Emboss Set.

- Distressed Stickles.

- Perfect Pearls with a Mini Mister.

- Dimensional Magic as glue.

- Gold cord from Spotlight or Crazy Clark's.

- Red ribbon from Crazy Clark's too.

** Sorry for yellow photos again!

For this ornament I used Dimensional Magic as the glue for the glitter. I was a bit heavy-handed with it and you can tell because it's warped a bit.

Can't tell so much from the top. Just be cool with the DM if you decide to use it.
Be cool, but fast.


I'm not going to list all the sizes of the boxes because I don't know what they are! I just made them up according to how much paper I had and what size I wanted to do.

If my piece of paper was 20 cm by 20 cm, I'd just score at 2 cm all the way around for the sides. And then make the base a tiny bit smaller. Not much, just a bit.

That Rock Candy Distressed Stickles looks so great on the vintage Santa.

Remember the tiny box ornament I showed you yesterday?

This one's a bit bigger. The sides are higher and it's probably 1 1/2 inches square. I like making the same thing in different sizes.


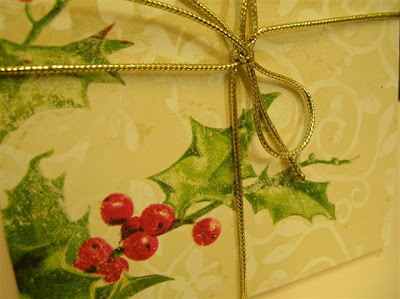
And to finish today I wanted to mention the Perfect Pearls.

See all that glitter on the box? It's Perfect Pearls. I sprayed all the boxes with it.
Now, Perfect Pearls is the name of the product and Perfect Pearl is the name of the colour of the one in the photo. I also have Perfect Pearls in the Sunflower Yellow I think it is (looks like gold).

All you do is get a little mini mister, fill it 3/4 or so with water and scoop some PP into it. Don't measure, just go for it. The more Pearls you put in, the pearlier your mist will be. Shake and spray. That's it!

I have a mister for the gold and for the pearl one. They're about 3 or 4 dollars each, so they're cheap.

And the good thing is...you still have the PP powder to use in other ways. Stamp in Versamark ink and brush PP over it. Lots of uses.

And like I say for everything....there's a lot of education out there on the web, all you do is google what you need help with and some lovely crafty person will probably have done a video on it that you can watch.

Well, that's it for the boxes today.

See you tomorrow for one last story to do with the craft tree.

Stay cool!

19 November 2009

Scor-Pal Thursday - Boxes

Hello! It's Scor-Pal Thursday!

Today is all about boxes of all sizes and shapes. So fun.

Firstly, a simple box template.

To make a box:

1. Decide on the size lid you want and then cut your paper one inch wider all the way around. Put your box on the Scor-Pal and score at 1" on each side.

(An inch is a good height for a regular box. That's about 2.5cm in metric)

2. To make the base, cut the same size piece of paper as the lid and then trim a tiny bit off two sides, so when you fold it up it'll sit inside the lid. If you're using cardstock you'll have to cut a little more off. When using paper just trim only a few mm, or an 1/8" of an inch.

I suggest making your box with just regular copy paper first, so you can check all your measurements and cuts are correct.

3. After you've scored your lines, cut your tabs as you can see in the photo.

These tabs need double-sided tape. I put an * on one tab in the photo, so you can see where I mean.

4. Then fold and tape your box together!

Note for you: Don't make boxes after you make envelopes, okay? With envelopes you cut the tabs off. With boxes, you don't. When you cut the tabs off your boxes three times in a row, you finally get that idea. Trust me on that...

Here's some boxes I made - all are October Afternoon papers - Ducks in a Row, Farm Fresh x 3, Weathervane, Cherry Hill, Good Cheer.


Cute for a baby shower. You know, with little socks in it, or a bib, or similar? Wrapping clothing can be hard, but not with a little box like this.

On all these boxes the ribbon is only on the lid, so the box stays neat and sits flat. And so it's easier to open.

Didn't record any measurements for this one. Not sure why...sorry about that.


You can use patterned paper from the same line for the base like I did here, or just plain card (would make it sturdier and cheaper).

Measurements:
* Lid - 8 x 8"
* Base - 7 and 7/8 x 7 and 7/8"
* Sides - 1"


I wasn't making these for any particular reason, I was just making them in different sizes.

This is similar in size to Erin's trinket type boxes that I've showed you before (Link in sidebar - How to Make Paper Boxes).

Measurements:
* Lid - 8 x 8"
* Base - 7 and 7/8" x 7 and 7/8"
* Sides - 5"


Made this tiny one on purpose. Just wanted to make a tiny one! And it's tiny!

The lid's too big and I barely took any off the sides. It's all trial and error.

Measurements:
* Lid - 3 and 3/4 x 3 and 3/4"
* Base - 3 and 5/8 x 3 and 5/8" (make a bit bigger)
* Sides - 1"

This is a favourite because it's a DVD box. What a nice way to give a DVD to someone. I'll use this in the future for sure.

Measurements:
* Lid - 18.5 x 25cm
* Base - 18cm 2mm x 24cm 2mm
* Sides - 2cm

This was supposed to be a DVD box, but I got my measurements wrong. I'll use it for something, but use copy paper first, people!

Measurements:
* Lid - 7 and 1/4 x 9 and 3/4"
* Base - 7 and 1/8 x 9 and 5/8"
* Sides - 1"


This one I made for my mum on purpose because she's into everything snowy. I made some snowman cards to put in it, but they didn't fit! And no, I didn't check them first. Didn't have time. Oh, well.

That's why I'm here, so you can learn from my mistakes.

And so I can learn from my own mistakes.

(I made some envelopes instead and it was sorted)

Measurements:
* Lid - 8 x 8"
* Base - 7 and 7/8" x 7 and 7/8"
* Sides - 1"

Well, that's it for the boxes today.

Will see you tomorrow for Scor-Pal Friday!

:o)

PS. Click here to purchase your Scor-Pal with a 15% discount. Please write SCOR15 in the comments section at checkout to claim the discount.

PPS. Alternatively, go to www.bluebazaar.com.au, shop online, then November NEW 7 on the left.

PPPS. Please read Monday's post, Nov 16, for more information. Thanks!

18 September 2009

That's better!

I've put these photos up again so you can click on them to see them larger, and actually see them larger!

I've been yapping about clicking on the photos to see the closer details, but the photos haven't been that much bigger, have they? It frustrated me, so I thought it might frustrate you too.

I have to post the photos on here in a smallish resolution, otherwise they just take up too much memory, but sometimes they need to be big so we can see the Glimmer Mist for example.

Okay, click on these to see them larger, and don't fall off your chair!


The lotus has the Distressed Stickles on the edges - you'll see it better now. Remember it doesn't glitter like glitter, it's more glassy.

In the future the photos will still be as they usually are, but sometimes I'll post some of them in a higher res so you can see the details.

Okay? Okay.

Delta Echo Bravo Romeo Alpha out.

Edited to add: Forgot to tell you that these Wisteria projects are on display at Photo Continental for the next few weeks. If you're over there (Logan Road, Mt Gravatt. Click on link in sidebar) check them out because they do look lovely in real life. Better than the photos.

Delta Echo Bravo Romeo Alpha really out.

Ah, pretty...

Hi, fellow crafters.

I have my last lot of Wisteria projects to show you today.

And what I did that I didn't expect?

I used the chipboard shapes to decorate the middle of these flowers. It was one of those things I didn't plan for, but it all made sense at the time, and onto the flowers they went. And they're big flowers and they needed something punchy in the middle.

I used regular Stickles in the middle of some of the flowers for some sparkle and accent. Crystal is my favourite.

And for even more glitter, I sprayed the whole thing with Pearl Glimmer Mist. So fun. Found it hard to stop spritzing once I started!

(The link I've provided will take you to the Tattered Angels site. There's quite a few Glimmer Mist how-to videos on the site. Also trouble shooting etc. Might be helpful for you. Swirl, don't shake!)

Remember you can click on the photos to see them larger.
If you do, please excuse the dust on the chair.
Thank you.


Took some close-up shots so you could see the Stickles and Glimmer Mist. Can you see the mist? It's subtle, but it's there. Added such a nice touch at the end.

I added Opal Dust to the edge of this card. Glitter, glitter everywhere. If it calls for it, you've gotta add it!


Okay, so there you go. More boxes, more glitter, more flowers, more fun. Hope you enjoyed it all!

The scallops I used were Marvy ones with the big Sizzix scallop die. You might have scallop Nestabilities dies, or scallop punches in other brands. Any of them work and look good. And we like good.

Okay, bye now!

17 September 2009

Glittery is good...

Well, here we have another paper box. Surprise, surprise.

This paper is from Basic Grey - Wisteria too.

You know, sometimes buying a complete paper collection in a kit can be a good idea. You get all the papers in the set, and you can use them together, or separately, for completely different looks.

In particular I found this line interesting to work with because I could choose different colour combinations.

Gold and purple.

Green and purple.

Blue and green.

Gold by itself.

Gold with any of the above.

You get my drift.


And if you get the chipboard accents in the collection, you've got things to put on the boxes, and on your cards. I love chipboard shapes for that reason. And that they already have some chunk that gives the card a bit of weight.

Art weight that is, not kilo weight. :o)

Okay. Here are the chipboard shapes from the Wisteria collection. You can see the dragonfly I used above. I added the Opal Dust - those big flecks of glitter look good.

I've used most of the Wisteria chipboard shapes, and I didn't know I was going to use them that way until I saw myself do it!

Stay tuned to see what transpired...

Edited to add: Found the chipboard shapes on my desk and found I didn't use most of them at all. What a fibber. I used a few of them. Some of them. The circular ones. And they were good.